
Laser cutting
- isabelleadora
- Nov 5, 2022
- 2 min read

Updated: Nov 6, 2022
In week 2, we learnt about laser cutting machines. This blog will include the hazards using one, the materials that can and cannot be cut and how to operate a laser cutter, more specifically the UNIVERSAL laser cutter.
Firstly, what is laser cutting? Laser cutters create patterns and designs by cutting or engraving the materials, using a laser beam that melts, burns, or vaporizes the material. How it works is the laser beam is created in the tube filled with CO2 gas. The laser beam is then directed to the laser head with the help of mirrors and lenses.
Hazards
Hazards | Safety Control Measures | Pictures to support explanation |
Fire → debris on cutting material may cause flare ups | Engineering → Install compressor air assist gas to blow at the area being laser cut | 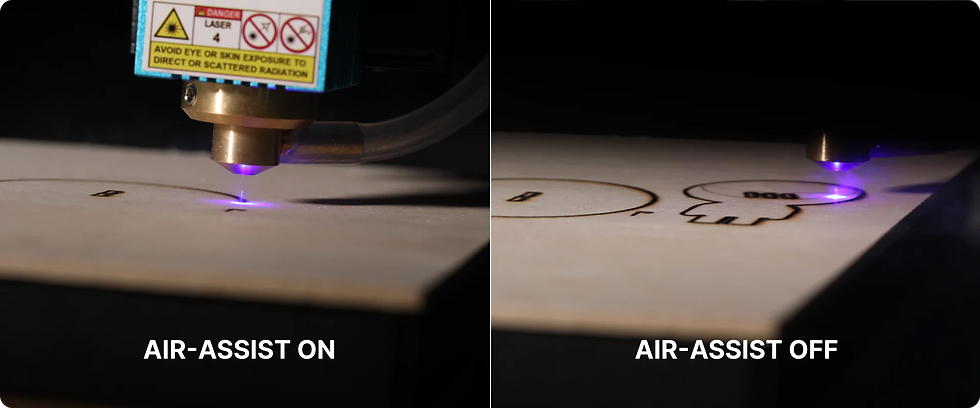 |
Laser beam → staring at the laser beam may cause eye damage | Administrative → Reminders to not stare at the laser beam |  |
Fumes from material → fumes may be toxic and pose as a health hazard | Engineering → Fume extractor is installed in the room to remove the fumes |  |
Fire → Materials may catch on fire in the middle of cutting or engraving | Engineering → A fire extinguisher is located near the laser cutter |  |
Materials
Materials that can be cut/engraved | Photo of material |
|---|---|
Paper/white card |  |
Cardboard |  |
Balsa wood |  |
Acrylic |  |
Plywood |  |
Materials that cannot be cut | Photo of material |
|---|---|
PVC |  |
Metal |  |
Foam |  |
Rubber |  |
Operation of UNIVERSAL laser cutter
Start up | |
|---|---|
|  |
2. Switch on the power for fume extractor |  |
Importing a file, changing the line colour/width and fill colour to meet laser cutting requirement | |
|---|---|
| |
2. On Corel-Draw, select file > import > select the .DXF file > press import |  |
3. At the bottom right hand corner, double click on fill tool, select solid colour icon |   |
4. To edit fill colour for engraving: change the colour model to RGB and type in R:0 G:255 B:0 | 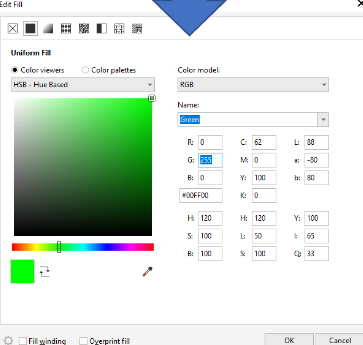 |
5. For vector cut and vector engrave: press on the fill icon at the top right (no cross on the box) |  |
6. To edit width and pen outline colour, select outline pen tool. |  |
7. For engraving, width is none. For vector cut and vector engraving, change style to hairline. |  |
8. Press colour, for vector cut: RGB red (R:255 G:0 B:0). For vector engraving, RGB green (R:0 G:255 B:0) | |
Setting the laser cutter software (power, speed, PPI) | |
|---|---|
|  |
2. Click on the cogwell for settings |  |
3. Click on load on Universal’s material settings |  |
4. Select presets that match with material type and thickness > select open |  |
5. Check and adjust for power, speed, PPI, Z-axis and once done, click OK. |  |
Sending the job to laser cutter machine and start the job | |
|---|---|
|  |
2. Shut the lid gently | |
3. Press either the PLAY button on UCP or the Physical button on the Laser cutter |   |
Shut-down |
|---|
|
DOs when there’s flame/fire on the material being cur | DON'Ts when there’s flame/fire on the material being cut |
|---|---|
Immediately hit the emergency button / switch off the power. Open up the cover to cut off the laser. | Continue cutting/engraving if fire still persists |
Inform staff in charge immediately | Use a fire extinguisher when the fire is small |
If the fire is negligible, try putting it out by blowing it off | |
If the fire is unable to blow off, remove material from the laser cutter and place it on the floor and step on it to put out the fire | |
If the fire is uncontrollable, go to the closest fire extinguisher and put it out. | |
Reflection
Before doing the competency test, I originally thought the process would be difficult and I would not be able to pass it. I was also afraid my SOP was not good enough and I was scared I missed out some steps. However, after the competency test, it was not as hard as I anticipated it to be. I think I was adequately prepared as the packages and videos from FABLAB made me more familiar with the process. But seeing it is different from actually doing it. I struggled , as it took me a while on how and where to select the layers/lines on the design. I was lucky that Mr Mark was there to teach and guide me on how to select them.
Laser cutting will definitely be useful in creating our chemical product as it was so quick -in a blink of an eye, the process was already done. This is unlike 3D printing which will take way longer to complete.
It was satisfying and I'm pleased with my final product. I hope to create more things with laser cutting, maybe cut or engrave with a much more complex design.


Comments